About a week ago an anon on Tumblr asked me to do a tutorial on the nails I did for day 26 for my 31 day challenge. Since I don't have the equipment to film a tutorial I did a photo tutorial. I hope I did well xD
Since it's not gonna be a gradient from light to dark or dark to light I first started picking 3 colors. I choose 3 pinks and started with the medium color which is Gum Pink from ELF.
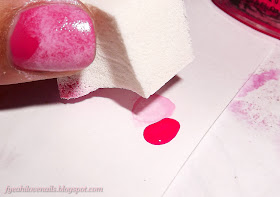
Then you want to take a little make-up sponge or whatever sponge works good for you and you dip it in the lightest color you have. I don't like to apply polish on the sponge itself, because I feel like the sponge sucks up the polish more.
It's gonna end up looking something like this.
Then take your darkest color and sponge it over the lightest color. A tip when you haven't sponged before; Don't sponge too hard. The sponge can leave some pieces which are gonna get stuck on your nail and you have to start over.
Then it might look something like this;
Then apply a flakie. I love a green flakie over pinks, but you can do whatever you want. Maybe a glitter or nothing. Then you want to apply a topcoat afterwards. A fast drying is recommended, but if you're not too impatient you can just use a not so fast drying one.
When your manicure is completely dry you want to take your stamping gear. I used the image on Konad plate m60 and I'm using a Konad stamper and scraper. I'm using a white stamping polish.
If you decide to use a white for stamping you really need a white stamping polish or you need to find a really opaque white polish. I believe Sally Hansen has a really opaque one, but a stamping polish is the best.
Then I clean up around my nails with pure acetone and a brush. You can also just use nail polish remover and a q-tip. I find a white stamping polish really hard to remove around my nails as you can obviously see :P
This is really simple to do, but for me it's also a little practice to see how to make a photo tutorial and maybe make other things in the future :)
Thanks for reading and thanks to the anon for the request!
xoxo Ingie
Bloglovin' • Hellocotton • Google+ • Instagram • Tumblr • Twitter


No comments:
Post a Comment